by - Lisa Rye
4. Base colours
Now we need to get down the base colours of the picture. There's a few rules I tend to follow when choosing colours for my backgrounds, I'll go through some of them in detail. These are also important later on when you're adding shadows.
Lighting
 |
 |
 |
The colour an object appears to be is effected by it's own colour, the light (or lack of light) from light sources (like sunlight or electric lights) and the objects and environment around it. |
Distance
 |
 |
| Crappy looking tree demonstration time! Which of the above two pictures looks more realistic to you? | Hopefully it was the right one. Objects in the distance tend to look lighter in colour. This is because of haze and moisture in the air. |
 |
 |
| Once again, which looks more natural? |
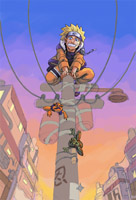
The trees on the right side again (hopefully ^^;). Things further away tend to take on a blueish tint. Ever noticed that mountains or hills far away look blue or purple even though they're covered with green trees? Basically it's this pricipal at work. In this Naruto picture, however, the evening light is picking up dust particles which give the light a yellow hue. Therefore things further away will take on more yellow hue.
|
 |
 |
 |
Okay, last demonstration. Which looks more realistic? The second picture, or the third picture? Well, it depends on the lighting conditions, (most likely in pure white light, the second would be correct), but in sunlight I find it's best to give shadows and shadowed areas a slight blue tint. |
Back to the picture... I've painted in all the base colours now. I still need to put in the light from the street lamp; that'll affect the area beneath it and probably the frog on the right.
Now it's about time I did something about the lineart... At the moment the pencil sketched lines doesn't look so great.
I inked some lines in on a new layer; it doesn't really matter what colours you use at this point (I just used the dropper to pick the base colour nearby and darkened it a little), you can always change them later. I'll blend them in a little after I've finished shading.
If you're working with a lineart you inked on paper, then you'll need to edit it so that the white areas become transparent; this is so you can change the colour of the lineart later on.
If you don't know how to do this, go here: Lineart Editting Tutorial


