by - ChiCha-Tutorials
For those interested in coloring graphically upon the computer, painting, pastels, colored pencils, markers, and any other coloring tool, skin tones are necessary part of human color. The worl is full of variety in color, including the human skin. I look around, and I see many people getting the skincolors wrong. It can be too yelow, too pink, or just not the right color. Getting a realistic skintone can be a really tricky business, but, there is an easy solution to this delimma. I created this tutorial for Photoshop on Photoshop 7. I'm not sure what else will be compatable before Photoshop 7, or other products, but I would think that the steps would be similar.
 |
For some quick skintones, you can grab a tones chart like the basic one I made on left, to use for coloring. Now, on the tones chart to my left, I have the tones for three nationalities- Caucasian, asian, and african -- which I've personally seen the most often in the art that I see at various art sites. These are approximate, no set exact for what the colors are. Also take into regard that these are around the extremes. The lightest lights, the midtone, and the darkest dark. |
A way to make a whole pallette from the three colors is not extremely difficult. Open a new canvas, does not really matter the size, but keep it no smaller than 468x60. Click on the gradiant tool on the left tool bar.
Go into the Gradient Editor, by clicking on the colored gradient on the top toolbar. Place the darkest of the three colors on one side, the lightest on the other, and the midtone in the middle. Keep the opacity at 100%. It should look somewhat like this. Press Ok, then click-drag a horizontal line across the canvas.
You can use the eyedrop tool to take the color from this canvas and color the skin of your project.
 |
Now that we have a pallete of color, we have to understand the effects of lighting on skin. It's a very simple concept, but understanding it is necessart to shading skin.
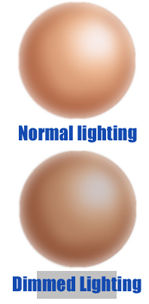
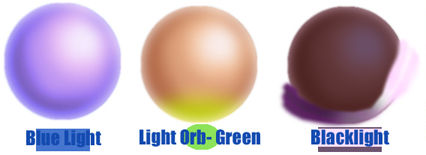
As any matter, the brighter the light, the lighter the highlight and the darker the shadow. The dimmer the light, the difference between the light and the shadow decreases. The shadow cast by it is also affected by the light and darkness. The color of light affects it in the same way. If the light is green, it will have a green tint to the skin. If it is a small light, such as a lamp, a smaller portion of the skin will be that color, instead of affecting the whole skin. As stated before, most matter is affected the same way as this. Ablacklight is slightly different. If you've ever been in a black light, skin is a dark grey-purple in color, while everything white and neon (i.e. clothes) glows a bright purple color. |

Remember to experiment by yourself. There probably are better ways to do this!

Each person is unique, so the choices are endless. Experiment and create you own chart to use for your art.

Why do we use a Pallette?
Our eyes can sometimes deveive us. Everyone's eyes see slightly different colors. One person will see a purple color, while another will see a blue. Those that are colorblind cannot distinquish some colors from another. While we see it to be a good skintone, it may not be seen as one to someone else.
Also, depending on the monitor that you own, you may see a different color than other computers. Making pallettes straight from photos heightness the chance greatly of realistic, more accurate works.
Also, these color pallettes are used professionally. Those who work with color correction use this to help them with their vocations. Even the printing press use this.
You can also take colors from the lips, eyes and hair to help with realistic color of those. You would use it the same way as you did for the skin. Finding the darkest, the midtone, and the lightest before creating a pallette to use.