by - wyldflowa
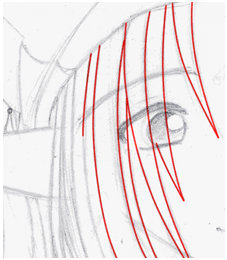
| First up, get your pen tool and use it to draw around the lines in the image. The lines you create with the pen tool are called "paths".
If you press Alt on your keyboard the pointer will change from the pen to a white arrow. Use this arrow to drag the control points ( the little arm things with bobbles on the ends) to alter the curve of the line at an anchor point. |
|
 |
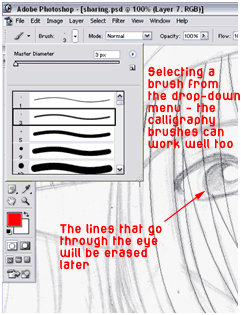
It's best to do this in sections - like hair, facial features, clothing, and so on - and make each section a different layer so you can erase out any lines that overlap (see the screenshot for example - the lines of the hair go through the eyes because the path is smoother if it is unbroken)
So at this point in time create a new layer and label it accordingly (e.g. "hair outline"). Next, change your brush size and type to what you would like the image to be outlines in ( I scanned in my picture at 200 dpi and I find that a 3px round brush works very well - for a sharper line a 2px square brush works pretty good too). |
 |
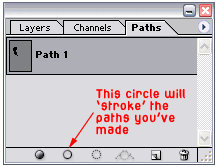
Now, in the layers window there are tabs at the top. If you click on the "Paths" tab the window will change to look like this with a thumbnail of the path you've just made. Make sure you're on your new layer then you can click the little empty circle at the bottom of the window. This will "stroke" the path (in layman's terms, it will draw a brush line wherever the paths are) |
 |
And look! Photoshop has done all the hard work for you! (As you can see here there are a few gaps in the lines; that's because I did this in a bit of hurry. If you spend some time making your paths just right there'll be less need to come back and edit them with the brush and eraser tools.) |
 |
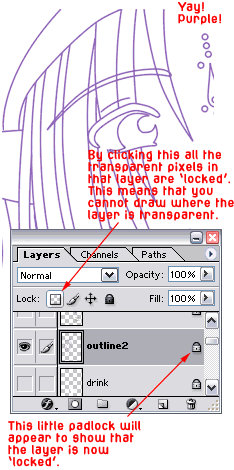
I find it helps to do the outlines in a bright colour such a red (they stand out against the greys of the original drawing) before changeing them to whatever colour I want. To do this I lock the transparency of the layer by clicking the little checkered box in the layers window Now that the pixels are locked you can make your brush really huge and sweep it right over the image with your desired colour. The brush will only draw where there are non-transparent pixels and so will only change the colour of your outline and not draw anywhere else besides it. |

|
And that's it really.
Just keep doing that over and over untill you've done it all. And now your outlines are all fixed you can use the magic wand tool to select each area and colour it in as you wish! It does take a while at first but the more you use the pen tool and paths the faster and more confident you will become. |